Configure Lorex N910 Series NVR / IP Camera for Cloud Recording, Backup, Monitoring and Playback
Contents
Introduction
Step 1. Connect the Lorex NVR to the Network; Access the Configuration Interface
Step 2. Setup Video / Image Resolution, Frame Rate and Bit Rate
Step 3. Configure the FTP/SFTP Settings
Step 4. Configure Lorex Motion or Continuous Recording Option
Step 5. Configure Lorex NVR System with Many Cameras
Appendix 1. CameraFTP Viewer
Lorex is a popular brand of security cameras and NVR systems,
known for providing a range of high quality products for
both home and business security. They offer various IP, analog, and wireless cameras and NVRs/DVRs.
Lorex is popular among users who want a do-it-yourself approach to setting up and managing a security system.
Most of Lorex IP cameras and NVRs support FTP, SFTP and SMTP for uploading images or videos to the cloud directly.
They also support ONVIF and RTSP. So they are compatible with
CameraFTP VSS
for cloud recording / backup.

Disclaimer: This document is not designed to
replace the product manual from the manufacturer. The information provided is
based on our knowledge of the model Lorex N910 NVR. We believe the information
is also applicable to many other Lorex IP cameras and NVRs.
The information may not be accurate or up-to-date. Users shall contact the
manufacturer for all device-related issues and contact us only for
CameraFTP-related (cloud service / FTP / SFTP / SMTP) issues.
The first 2 steps are device-related. You can use tools and documentation from the manufacturer to connect the device to the network.
If the NVR is already connected to the network, then you can skip the 2 steps.
Connect the NVR (camera) to a network router or switch with an Ethernet cable.
For NVRs, you can connect a monitor and configure it directly. For IP cameras, you need to find the device's IP address,
then use a web browser to configure it. You can also use Lorex's desktop program or mobile apps to configure the device.
Please read the device's product manual for detailed information.
Lorex N910 NVR has a lot of features.
You can visit the product page & read the product manual
for detailed information about how to
configure the device.
The system has two video streams: a Main Stream and a Sub Stream. The Main
Stream is the high quality video stream optimized for local recording. The Sub Stream is the lower resolution video stream
optimized for cloud recording. You can customize the
video quality settings for these streams based on your needs and the subscription plan you ordered.
To configure recording quality:
1. From the Live View display, right-click to open the Quick Menu, then click Main Menu.
2. Click Devices, then Record Settings. Click the Record Settings tab from the side panel.
Note: If you change the video resolution, the setting is applied automatically without the Save button. The
camera might reboot and you will need to log in again.
For video recording, the selected video stream resolution and frame rate should be based on the service plan you subscribed to.
( The video frame rate and bit rate are not applicable to image / timelapse recording. )
The Bit Rate is for video recording only. Higher video resolution / frame rate usually requires higher bit rate.
Setting it too high may slow down your network or cause failed uploads; setting it
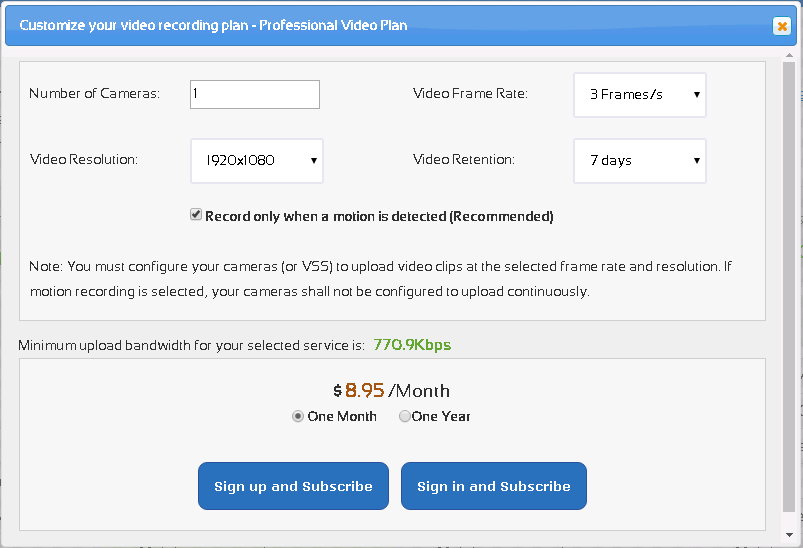
too low will affect the video quality. You can use our bandwidth calculator to
estimate the bandwidth. Visit www.cameraftp.com,
click Pricing, and then customize a service plan. See the screenshot below.
Note for estimating the bandwidth, Number of Cameras should be set to 1.

For the video plan of 1920x1080, 3 frames/s, the estimated bandwidth is 770Kbps.
you can set it to a value smaller than 1024Kbps.
If you cannot set a low video resolution, then you should try to set a low bit-rate if possible. We can work out a special plan for you.
Click Ok to save the settings.
Lorex NVRs / cameras can record video clips or image snapshots to CameraFTP cloud. You need to configure the FTP settings:
1. From the Live View display, right-click to open the Quick Menu, then click Main Menu.
2. Click System, then Storage. Click the FTP tab from the side panel.
3. Check Enable to allow FTP connection, and select either FTP or SFTP. The SFTP connection is more secure and firewall-friendly.
4. Configure the following FTP/SFTP settings:
• Anonymous: Disabled.
• File Size: Enter the recording file length in minutes. We recommend entering 1.
• Camera: Select a channel to set FTP recording preferences for.
• Current Date: Select a day of the week to configure FTP recording settings for, or select
All to apply to all days of the week.
• Picture Upload Interval: Enter the interval between snapshots in seconds. It applies only if you want to record images. If your
upload frequency is 1 image per x seconds, then the upload frequency is 1/x images per second.
• Camera: Select a channel to set the snapshot preference for; or you can apply it to all cameras.
5. Click Apply to save changes
Click Surveillance -> FTP,
you can see the screen as follows.
If you don't already have an account on
CameraFTP, please open a new web browser window/tab, visit www.cameraftp.com and
sign up for a free/trial account. CameraFTP offers the basic service for free. It also includes 3-day free trial of our cloud recording service.
Assuming you have a CameraFTP account, please log in to www.cameraftp.com website. Go to My Cameras page, click Add to add a camera. Please see the screenshot below:
If you have multiple available camera licenses, please select a correct license to use with this camera.
Enter the camera (folder) name, description and model info as shown in the above screenshot. Click Save. It will add a camera folder to your CameraFTP account.
Go back to My Cameras page by clicking My Cameras, you will see the new camera folder as follows:
Click the Settings icon below the camera thumbnail, it will display the Camera Properties page as follows:
(you might need to scroll down)
Now, go back to your NVR (camera) device's FTP configuration page and enter the FTP info as follows:
You can also configure the NVR / camera to upload with SMTP; but FTP/SFTP based uploading is more efficient.
If you ordered a continuous-recording plan, you need to set a continuous schedule.
If you ordered a motion-triggered recording plan, then you need to configure the device to upload when a motion is detected.
You need to configure motion detection settings, Events, and event (motion detection) schedule.
Please follow the instructions in the product manual.
An NVR system usually includes many cameras (channels). You can try to configure each camera (channel) separately.
It probably is doable, but
involves a lot of repetitive work. If you ordered the same subscription plan for all cameras (channels), then you don't need to configure each
camera separately. You can configure the NVR to upload footage from all cameras (channels) to one camera folder on CameraFTP. Then you just need
to send an email to CameraFTP customer support. We can configure the server to automatically separate footage into different camera folders.
You are all done!
After your NVR/camera is setup, you can
log in to www.cameraftp.com to view
or play back your camera footage from anywhere. You can also download
CameraFTP Viewer app for iOS, Android and Windows.
Note: Lorex NVRs / IP cameras support RTSP (and ONVIF?). It is likely compatible with
CameraFTP VSS-based Live Viewing, Cloud Recording and Local Recording. If you already have a Lorex NVR, then VSS
is not necessary. Otherwise, you can
use a PC with VSS as a cloud-recording NVR.
VSS supports 2-way live video & audio viewing/calling from anywhere.
Cannot get it to work? Please read our
Trouble-shooting Guide.