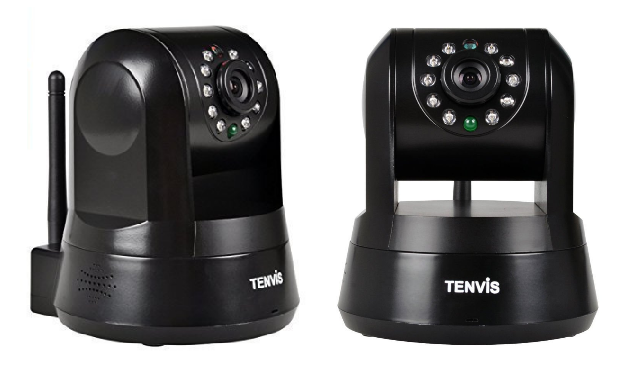
Configure Tenvis TZ100 / IProbot3 HD 720P PTZ Camera for Cloud Recording, Monitoring and Playback
Contents
Step 1: Connect camera to the network and find IP address
1.1 Connect camera to the network
1.2 Find the Camera’s IP Address
Step 2: Configure the Camera Using the Web-based Configuration Tool
2.1 Setup or Re-configure Wi-Fi
Step 3. Configure the FTP settings
Step 4. Configure Video Profile and Image/Video Recording Options
4.1 Configure Video / Image Settings (Resolution, Frame Rate, Bit Rate)
4.2 Configure Video or Image Recording
4.3 Configure Motion Detection
Introduction
Tenvis TZ100 / IProbot3 HD 720P Pan-Tilt network camera is compatible with CameraFTP cloud recording service. This camera can record image snapshots at the maximum frequency of 1 image/s. While it supports H.264, this camera cannot directly upload video clips to CameraFTP.
Its main features include:
- Superb HD 720P Video resolution with up to 30 fps.
- H.264 video compression
- Supports PTZ and two-way audio
- Supports both wired and wireless connection, but not PoE
- Easy WiFi Configuration
- Supports motion-triggered and continuous cloud recording to FTP server
- IR LEDs for Night Vision Up to 24 feet distance for 24-hour surveillance
Basic camera information
| Video / image resolution | 1280x720, 640x360, 320x180 (Can only upload 1280x720 images) |
| Audio recording | No |
| Image upload frequency | 1 image per second or lower frequency |
| Video frame rate | 1,2,3,...,30 fps |
| Night-vision | Up to 24 feet (?) |
| Image snapshot recording | Supported |
| Video clip recording | Supported. |
| Motion detection | Supported image snapshot recording |
| Continuous recording | Supported image recording |
| Supported video format | N/A |
| Connection type | Wi-Fi and Ethernet cable |
| PoE (Power on Ethernet) | No |
| Indoor / outdoor | Indoor |
| Lowest pricing (as of 7/1/2016) | $64 |
Note: This document is not designed to replace the product manual from the manufacturer. The information provided is based on our knowledge of the models Tenvis TZ100 and IPRobot3. It may not be accurate or completely up-to-date. Users shall contact the manufacturer for all camera-related issues and contact us only for CameraFTP-related (cloud service / FTP) issues.
Most of the setup steps below are camera related and are very trivial. If you have finished these basic steps before, then you can skip Steps 1 and 2.
Step 1: Connect camera to the network and find IP address
1.1 Connect camera to the network
If you want to use wired connection, you just need to connect the Ethernet cable. Otherwise, there are several ways to connect the IP camera to your Wi-Fi network. Please read the product manual for detailed instructions.
(1) If your Wi-Fi router does not support WPS, then you can connect the camera with the router using an Ethernet cable first. You can configure the Wi-Fi settings in the camera's configuration pages later. For Wi-Fi only cameras, you must use manufacturer's mobile app to connect it to the network.
(2) If your Wi-Fi access point/router supports WPS, then it is very easy to connect your device to the network.
Turn on the camera and press the WPS button on your Wi-Fi access point (router) for 3 seconds; the WPS button will usually start flashing. Next, quickly press the WPS button on your camera. In about 1 minute, you will see the status light changes, indicating it is connected to the wireless router.
1.2 Find the Camera’s IP Address
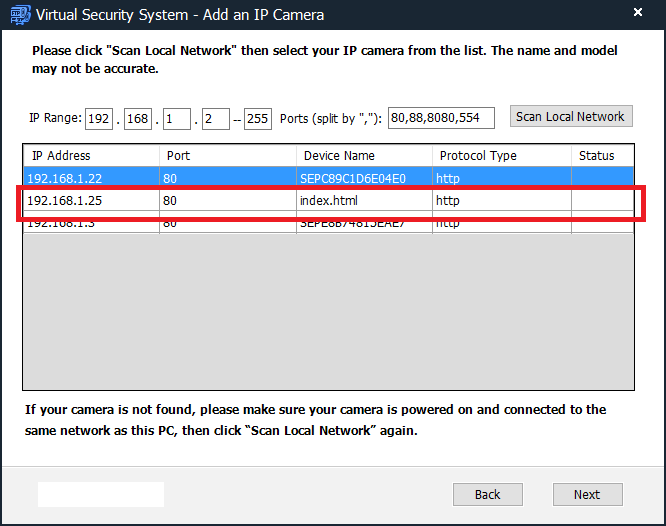
Please refer to the manufacturer’s manual for more detailed information. Usually you will run the included IP Camera Search Tool to find the camera. If your computer does not have a DVD/CD drive, then you can download CameraFTP VSS software to find the camera's IP address. ( After you find the camera's IP address, you can stop / uninstall VSS. Note: This camera is compatible with VSS-based Cloud Recording. You can use VSS as a cloud-enabled NVR, which requires a PC. )
Step 2: Configure the Camera Using the Web-based Configuration Tool
Most IP cameras don't support Chrome, incl. this camera. So please download Firefox web browser if you don't have it already. Launch Firefox, and visit:
http://IP_ADDRESS/(e.g. http://192.168.1.2)
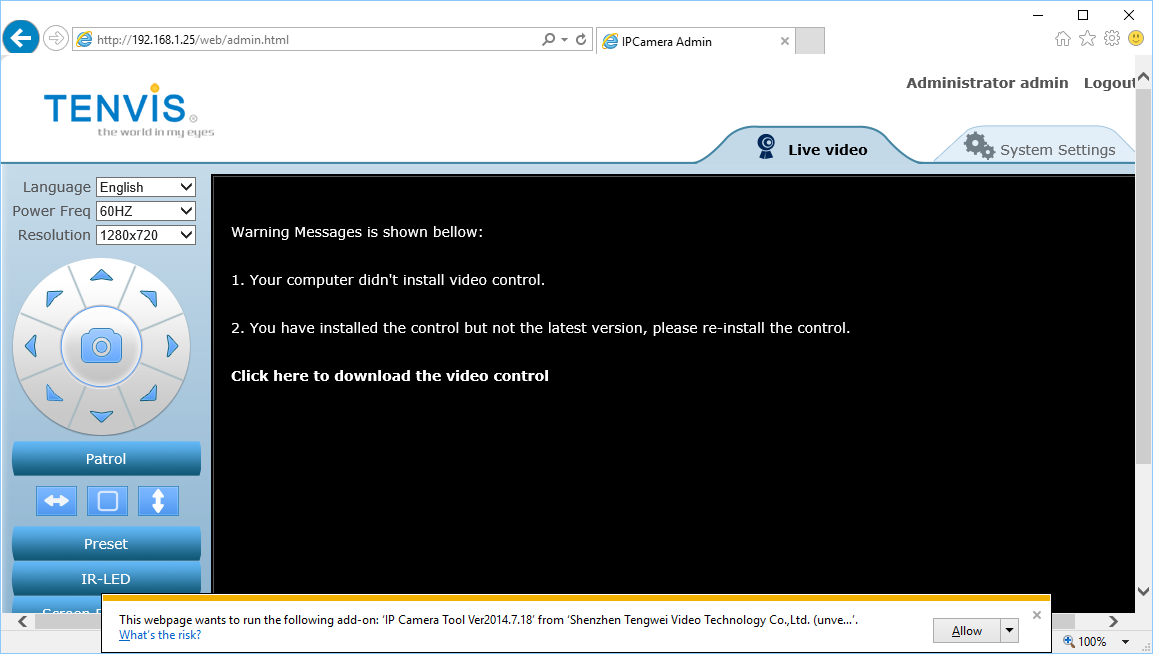
The default username is admin, and password is admin. (It is recommended that you change the password.)
After you log on to the camera, please install the Plug-in. Then you can see the live view screen.
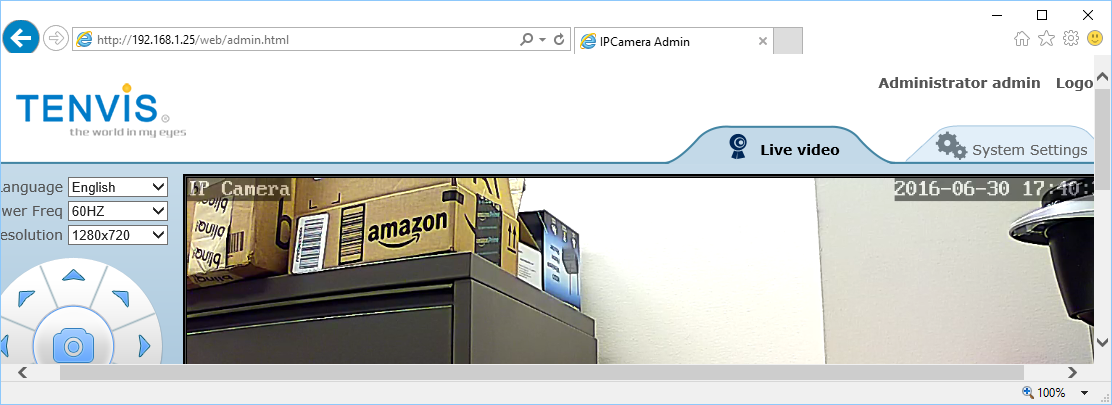
Click "System Settings", it will display the main setup screen:
2.1 Setup or Re-configure Wi-Fi
If you had already connected the camera with your wireless router, then skip this step.
Otherwise, click the Network tab, then click Wireless Setup to config Wi-Fi.
Step 3. Configure the FTP settings
Click Alarm --> FTP Settings, you will see the FTP Settings screen as shown in the screenshot below.
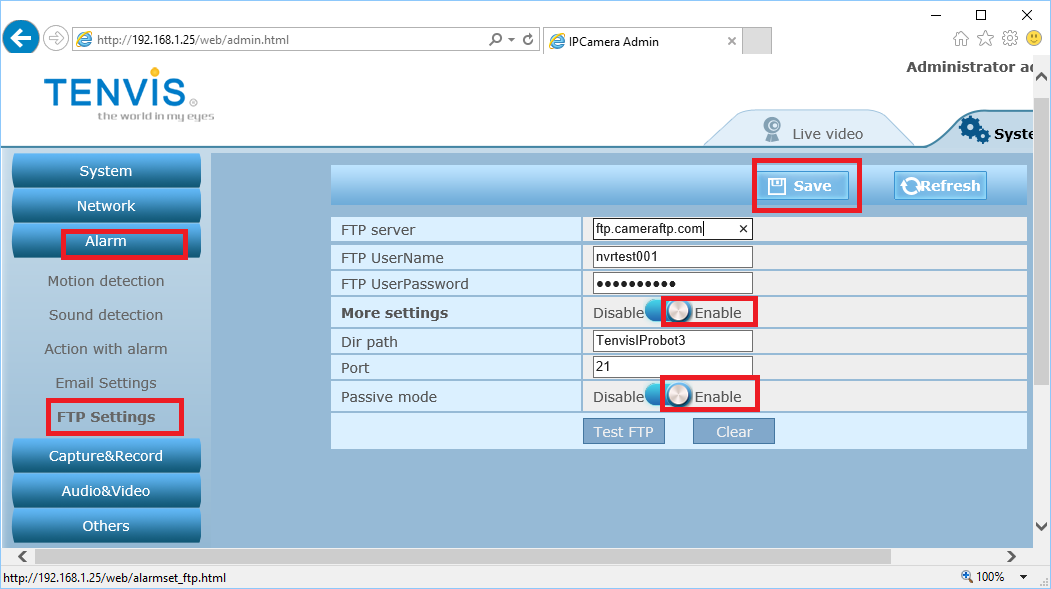
If you don't already have an account on CameraFTP, please visit www.cameraftp.com and sign up a free trial account. CameraFTP offers 3-day free trial. When the trial ends, you will need to order a subscription to continue using the service.
Assuming you already have a CameraFTP Account, then you need to enter the following info:
- FTP Server: ftp.cameraftp.com
- Port: 21
- FTP Mode: PASV (This camera uses PASV by default. No configuration is needed)
- FTP Path: You camera folder path.
- Username / Password: FTP username is your CameraFTP username, FTP password is available in Configure IP Cameras page. (Your CameraFTP password may also work). You need to add a camera from www.CameraFTP.com website and associate the camera with a license key first.
Click Save to save the settings. After that, you need to configure the video / image resolution.
Step 4. Configure Video Profile and Image/Video Recording Options
Based on your subscription, you need to configure either video settings or image snapshot settings. You shall not configure both settings, otherwise, you need to order two separate camera licenses.
4.1 Configure Video / Image Profile (Resolution, Frame Rate, Bit Rate)
Click "Audio & Video" --> "Video Parameters", you will see the screen below.
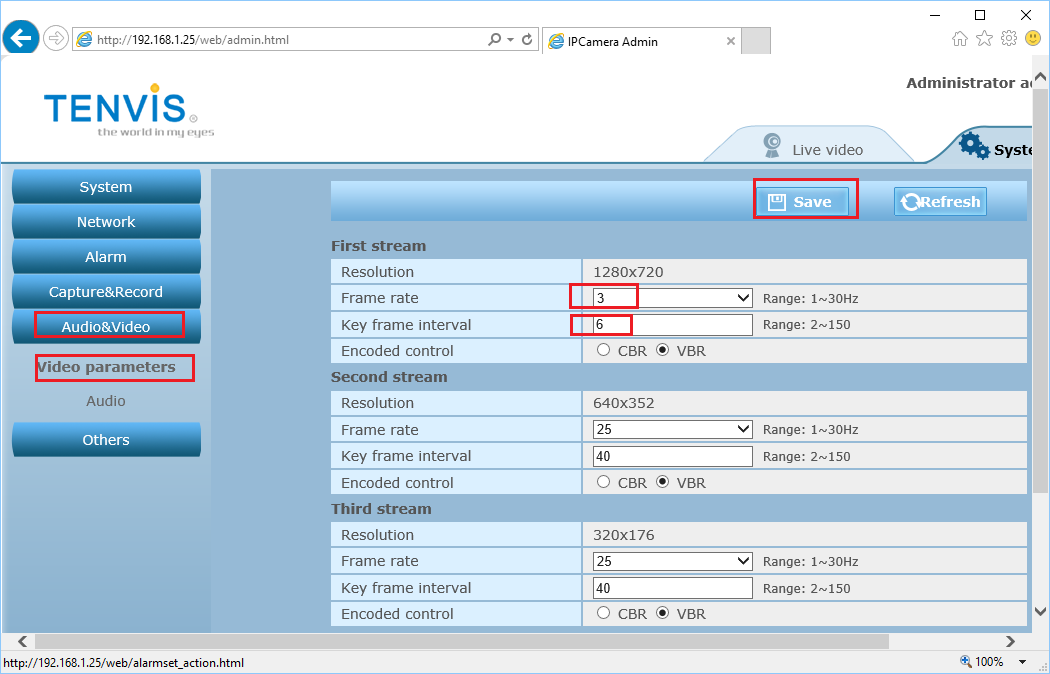
You only need to configure the first stream of 1280x720.
The resolution and frame rate should be based on the plan you subscribed to. However, this camera may only support 1280x720.
The Bit Rate is a little tricky. Setting it too high will use too much bandwidth, thus dramatically slow down your network, causing failed uploads; setting it too low will affect the video quality. You can use our bandwidth calculator to estimate the bandwidth. Visit www.cameraftp.com, click Pricing, and then customize a service plan. See the screenshot below.
Note for estimating the bandwidth, Number of Cameras should be set to 1.
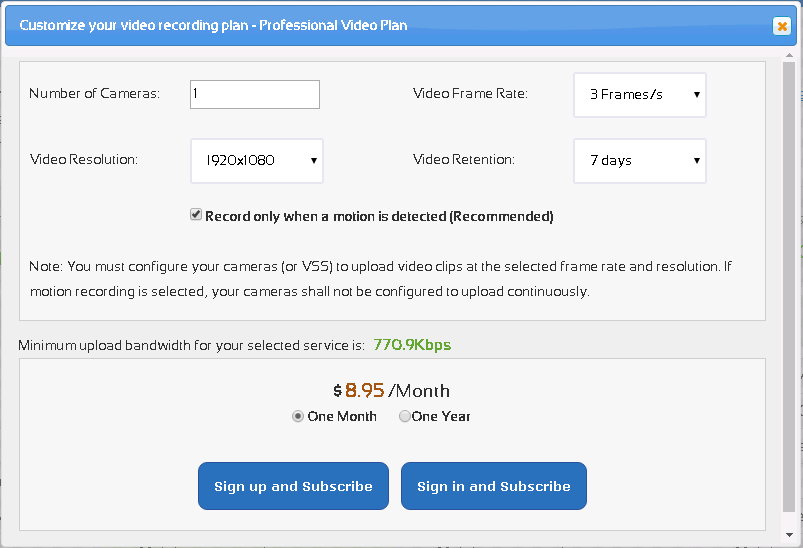
For the video plan of 1920x1080, 3 frames/s, the estimated bandwidth is 770Kbps. You you can set it to a value smaller than 1024Kbps.
If you ordered an image plan, then you only need to select the correct video resolution. The resolution of the image snapshots will be the same as the First Stream video.
Click Save to save the video settings.
4.2 Configure Video or Image Recording
If you ordered an image recording plan, then you should configure Alarm Action to upload image snapshots to FTP server. This camera cannot upload video clips to a cloud FTP server.
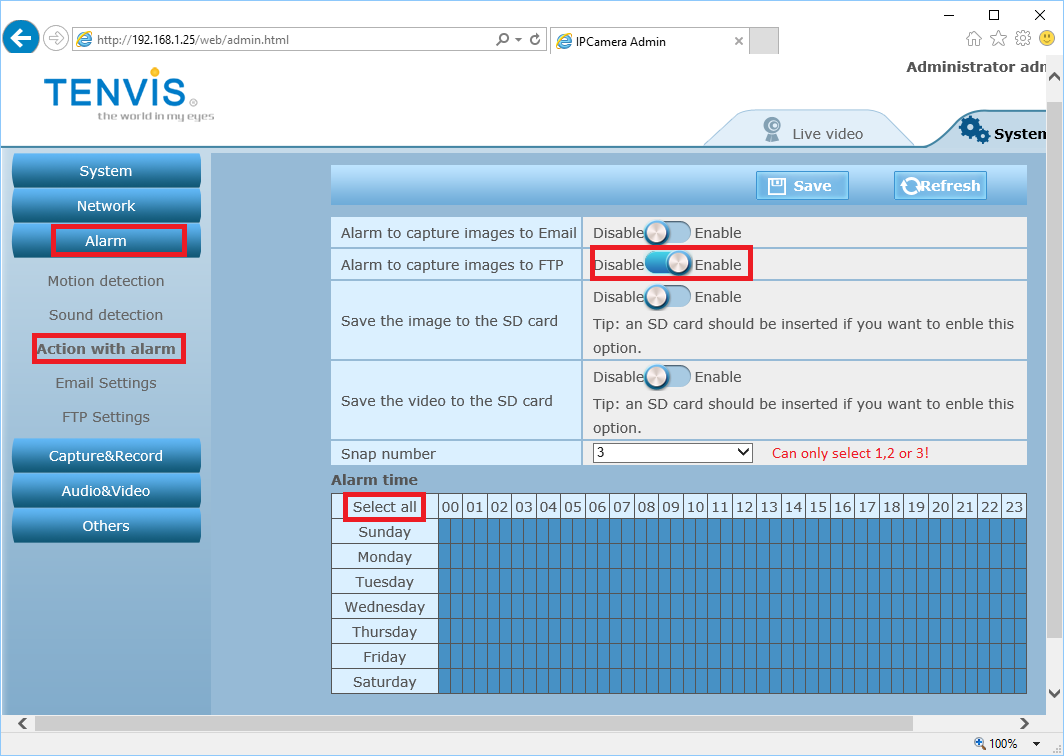
- "Alarm to capture images to FTP" must be enabled. Each motion will trigger 1 - 3 images to be uploaded in 3 seconds. Continuous events will trigger continuous recording at 3 images/30 seconds.
For the image recording plan, you can only order 1 image/10 seconds at 1280x720 with motion-triggered recording.
You can set continuous image recording in the Time Capture screen. Click "Capture & Record" --> "Timing Capture":
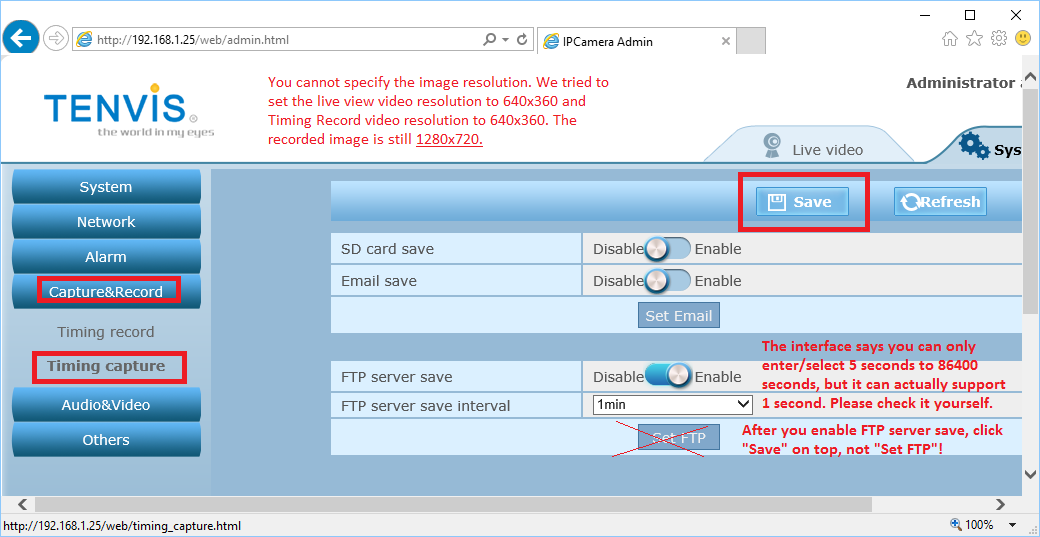
Note the interface tells you that you cannot upload more than 1 image/5seconds; in reality, you can input 1 second in the "FTP Server save interval" field. So tha max upload frequency is actually 1 image/s. The image size is always 1280x720.
4.3 Configure Motion Detection (required)
Click the Alarm tab à Motion Detection as shown below.
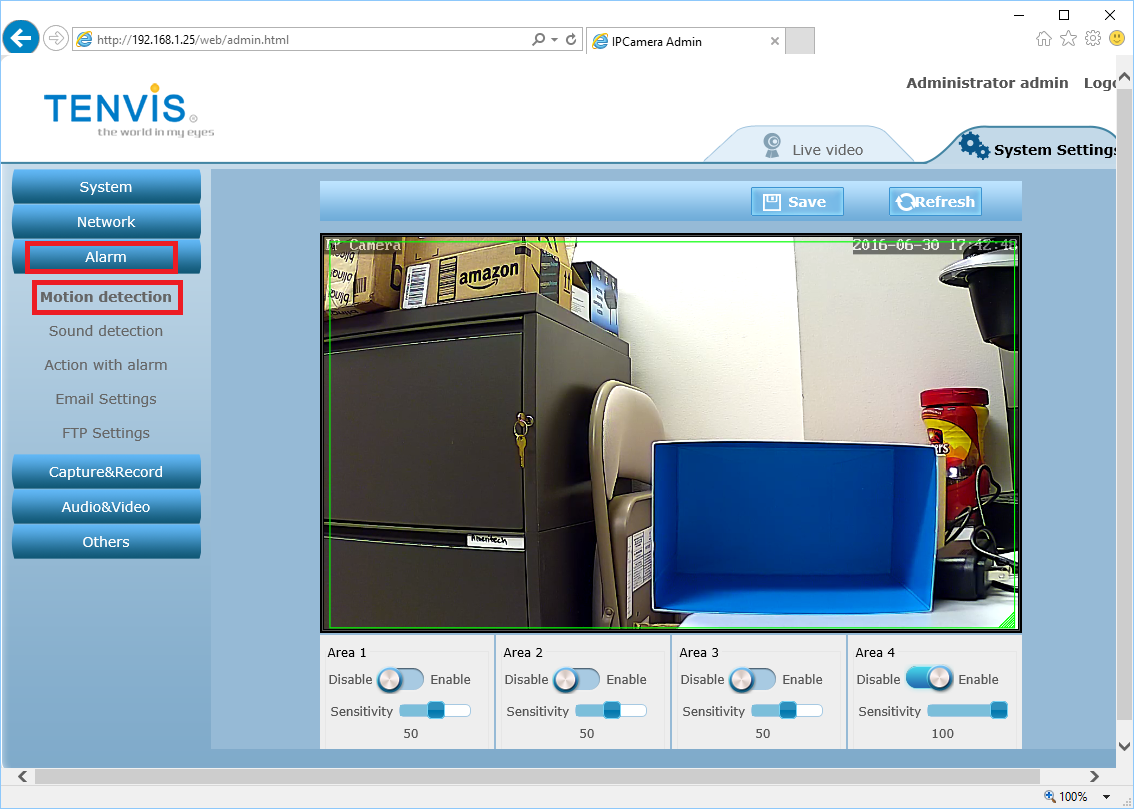
Just select an area, then draw a rectangle and set the motion sensitivity.
Click Save to save the change.
NOTE: Please do not configure both continuous and motion-triggered recording. It will be considered as two camera licenses!
You are all done!
5. CameraFTP Viewer
You can disconnect the Ethernet cable if you want to use Wi-Fi. If you need to make changes, you can run the CameraFTP Virtual Security System program again to find the camera’s IP address (as it may change with DHCP), and then access the camera’s Configuration pages.
After your camera is setup, you can visit www.cameraftp.com to view or play back your recorded footage from anywhere. You can also download CameraFTP Viewer App for iOS, Android and Windows Phone.
Cannot get it to work? Please read our Trouble-shooting Guide.