Configure HikVision Network Cameras for Cloud Recording, Remote Monitoring and Playback
Contents
Step 1: Connect camera to the network and find its IP address
Step 2. Access Camera's Web-based Configuration Tool
Step 3. Configure video profile
Step 5. Configure Events (Motion Detection and Snapshots)
5.1 Configure Motion Detection
5.2 Configure Image Snapshot Settings
Hikvision is one of the largest security camera manufacturers. They have many different camera models similar to TRENDnet.
Many of their cameras are designed for out-door use. They support image/video resolutions of
2048x1536, 1920x1080 and 1280x720 or higher resolutions. All of their cameras can upload image snapshots to a cloud FTP server.
It seems most of their cameras support CameraFTP VSS.
With the help of CameraFTP VSS software running on a PC, they can upload video clips to the cloud.
 |
 |
 |
 |
| 2CD2T42WD-I5, 4MP | 2CD2032-I, 3MP | DS-2CD2432F-IW, 3MP | DS-2CD3132, 3MP |
Basic camera information
| Video / image resolution | 3MP, 4MP, 1920x1080 and 1280x720 dependent on the camera model |
| Audio recording | No |
| Image upload frequency | 1 image/s, 1 image/N seconds (N: 1 to 65536) |
| Video frame rate | |
| Night-vision | Up to 100 feet for outdoor models |
| Image snapshot recording | Supported, supports 1 image/s, 1 images/N seconds (N: 1 to 65536) |
| Video clip recording | Not Supported (Support with CameraFTP VSS) |
| Motion detection | Supported |
| Continuous recording | Supported |
| Supported video format | N/A (.mp4 with CameraFTP VSS) |
| Connection type | Ethernet cable |
| PoE (Power on Ethernet) | Yes |
| Indoor / outdoor | Outdoor |
| Lowest pricing (as of 6/1/2016) | $119.99 (Hikvision DS-2CD2032-I 3MP PoE Outdoor camera) |
Note: This document is not designed to replace the product manual from the manufacturer. The information provided is based on our knowledge of the model Hikvision 2 Series network cameras. It may not be accurate or completely up-to-date. We have not fully tested these cameras. Users shall contact the manufacturer for all camera-related issues and contact us only for CameraFTP-related (cloud service / FTP) issues.
The first two steps are camera related and are very trivial. If you have finished these basic steps, you can skip Steps 1 and 2.
Step 1: Connect the camera to the network and find its IP address
Insert the Setup CD, follow the instructions to connect your camera. Many Hikvision outdoor models support PoE. So usually you need a PoE switch, or you need a compatible power adaptor.
You will need to use the manufacturer's software to find the camera's IP address. After that, you need to launch a browser to access the camera's configuration website. For more detailed info, you can read Hikvision 2 Series Camera Manual.
This camera may require you to change the default password as the first step. The default username and password is admin / 12345. After logon, you will be asked to install the plugin for live viewing the video. (Usually you need to use Firefox or Internet Explorer.)
Step 2. Access the Camera's Web-based Configuration Tool
Now we have found the camera's IP address. The first step is to log on to the camera. Enter the camera’s username and password, click Ok. It will go to the camera's configuration website.
The CameraFTP service setup is generally not dependent on any parameters in the System section of setup. You can quickly check this section and see if you need to configure anything.
Step 3. Configure the video profile
You can access the video settings screen from:
Configuration >Basic Configuration > Video / Audio > Video
Or
Configuration > Advanced Configuration > Video / Audio > Video
you can see the screenshot as follows:
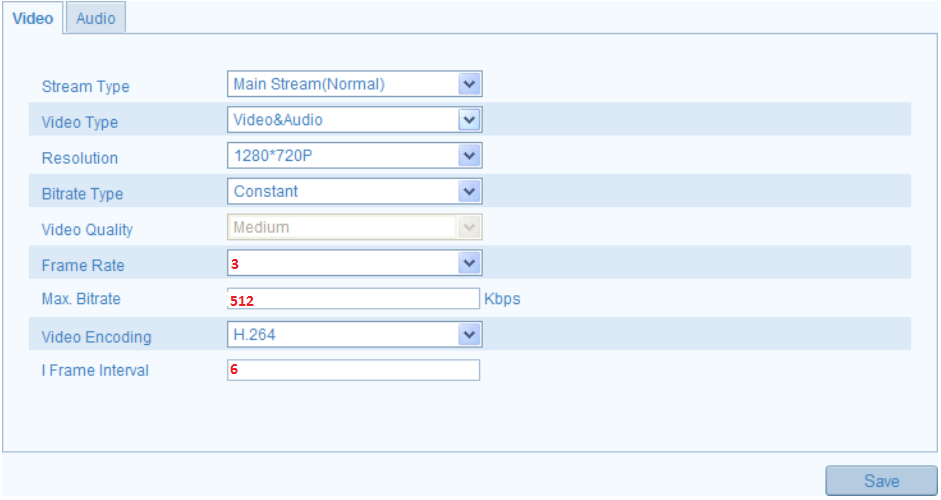
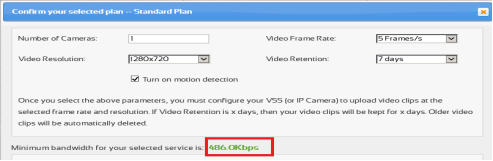
The parameters to enter are dependent on your subscription level. For most Hikvision cameras, the lowest resolution is 720P, so your plan should not be lower than 1280x720. By default, this camera cannot upload video clips, so the frame rate is not used here. However, if you use CameraFTP VSS for video recording, then you might want to set the frame rate based on your video subscription plan. Similarly, the max bit-rate is not used for image snapshot uploading. If you use VSS for video recording, then the default bit rate is designed for local network only. Setting it too high will slow down your network connection and causing upload to fail. Please also make sure your Internet connection has enough upload bandwidth. (ADSL type of connection is usually too slow, you might need to set the bit rate even lower.) Assuming you have enough upload bandwidth, you can set the maximum bit rate based on the bandwidth calculator. (Visit www.cameraftp.com, click on Pricing, and then customize a plan)
Step 4. Configure FTP Settings
From Configuration --> Advanced Configuration --> Network --> FTP, you will see the following screen.

You need to set the following parameters:
- Server address: ftp.cameraftp.com, or 66.220.9.45
- Port: 21
- Username, password and confirm password: The username on CameraFTP.com; you can still use your CameraFTP password, but it is recommended using one of your camera license keys as the password. You will need to add a camera on cameraftp.com website first.
- Directory structure: Save in directory
- Directory: With Camera Name
- Upload type: Upload pictures
Step 5. Configure Motion Detection and Snapshots
5.1 Configure Motion Detection
If you ordered a plan with motion detection enabled, then you must configure motion detection with your camera. Click Configuration --> Advanced Configuration --> Events --> Motion Detection. You will see the screen as shown below:

- Enable Motion Detection: Enabled
- Draw a motion area in Area Settings; set the sensitivity level;
You also need to set Motion Detection arming schedule. See the screenshot below:

5.2 Configure Image Snapshot Settings
This camera can only upload image snapshots and not video clips. CameraFTP has viewer apps that can play the recorded image snapshots just like video clips. If you ordered a video plan, you need to: (1) order a new image plan and cancel the old video plan; or (2) Run CameraFTP VSS on a PC. Do not configure FTP in the camera. VSS can upload video clips to CameraFTP.
The snapshot image resolution is set in the Video section (Video resolution).
If you ordered a continuous image recording plan, you need to click Events à Snapshot. See the screen below:

In the Timing section:
- Enable Timing snapshot: Check it
- Format: JPEG
- Resolution: 1280x720 (based on your CameraFTP service level)
- Quality: Medium
- Interval: 1 second (based on your subscription level)
If you ordered a motion-triggered recording plan, in the EVENT-TRIGGERED section, please set:
- Enable Event-Triggered Snapshot: Check it
- Format: JPEG
- Resolution: 1280x720 (based on your CameraFTP service level)
- Quality: Medium
- Interval: 1000ms (based on your subscription level). If you ordered 1 image/2s, then enter 2000ms.
- Capture Number: 10
Click Save to save the settings.
6. CameraFTP Viewer
You are all done. For safety, you can reboot the camera to make sure it still works fine. If you need to make changes, you can run the setup program again to find the camera’s IP address (as it may change with DHCP), and then access the camera’s Advanced Configuration pages.
After your camera is setup, you can visit www.cameraftp.com to monitor or play back your recorded footage from anywhere. You can also download CameraFTP Viewer App for iOS and Android.
Note: Hikvision cameras cannot upload video clips to FTP server directly. To upload video clips, you can use CameraFTP VSS on a PC. These cameras are compatible with VSS-based Live View, Cloud Recording and Local Recording.
If you use VSS for video recording, it is important to set the correct video frame rate and bit rate in Video Profile Settings.
Cannot get it to work? Please read our Trouble-shooting Guide.